Posts

Showing posts with the label Cake Decorating

Halloween school fun

Image
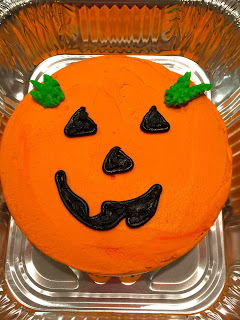
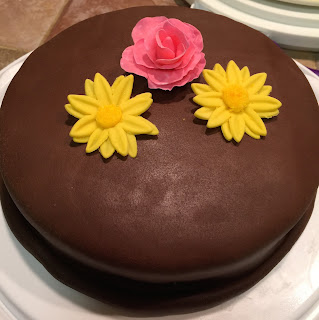
I haven't baked much for Gregory's school this year.  But the school asked parents to make small cakes for the Pumpkin Palooza this Saturday for the "cake walk."  While making the cakes, I had to also make cupcakes for Gregory's school.... how can I bring cakes to his school if he doesn't have treats in his class.  So, it's not my best work... I baked everything and made the icing and decorated all in one evening.  By the time decorations were done, I was ready to call it a day.

My Mom's Birthday Cake

Image
My parents' anniversary and my mom's birthday are in the same month.  Fortunately, I had some flowers pre-made still and used pink and purple dust to give them color.  

My Parents' 50th Wedding Anniversary Cake

Image
I was a nervous Nelly doing this cake.  A month ahead of time, I made the flowers out of fondant and gum paste.  I used toothpicks, when I should have opted for wire to better secure them in the cake.  I used gold dust to give the flowers a golden sheen. My mom had her original cake topper - yes, 50 years old!  She requested that I paint the hair of the bride white, because my mom's natural hair color is white and has always been that beautiful color.  I touched up the gown that had some yellow in it from age, but it didn't require much work. This was the first time doing a cascade of flowers; first time doing a tier cake of three levels and first time using malt straws as support for each level.  I decorated the bottom two layers at home, with the middle section in quilt fashion and gold sugar balls.  I finished the cake at my parents home, because I was worried about transporting it.  Here are the pictures. Something to note:  The roses on ...

Wilton Modeling 101 - Puppy Figurine

Image
For this class, we used the Measure N Shape sizing tray.  I like this idea, because if I made this again for a dog or another animal, I can have a measure tool to get the right sizes other than looking at a You Tube video and "guestimating" how much gum paste or fondant or Shape N Amaze edible decorating dough (which is what we used in the class). Make some gum paste glue by mixing water and shaved pieces of gum paste. The Shape N Amaze dough is HARD.  Break off small pieces and work in your hands until easy to move.  Then put under saran wrap to keep it soft.  Color the fondant as you need (put a small amount of dye into the center and fold over the center to keep the dye off of your hands). Tint enough for the entire dog, about 2 1/5 inch ball of fondant. (takes a little more than half of the shape n amaze in a store bought container) For Body of the dog: Tint a 1 1/2 inch ball of fondant or if using the sizing tray - put the dough into #13 box, press into the box ...

Fondant Taste Testing

Image
I was on the look out for fondant, specifically good tasting pre-made fondant.  I've heard of people making their own fondant, but I was hoping for an easy pre-made solution.  Wilton has fondant, but they are pretty gross.  The only one I heard good things about was the chocolate Wilton fondant.  I was also suggested to try the Fondarific wedding flavor fondant. I made two single layer cakes and covered one with Wilton's chocolate fondant.  I tasted a little bit of the fondant before putting it on the cake - it taste like a Tootsie Roll. I covered the other single layer cake with Fondarific wedding flavor fondant.    I tasted a little bit, but could not detect a wedding flavor at all!  I added wedding flavor to it, but still it didn't maintain the flavor.  I did color marbling on the this fondant, just for fun. My dad said both were good.  Gregory liked both.  My husband and mom both said - Yuck to both.  The taste was "bad" bu...

Mirror Glaze Caketastrophy

Image
EDIT TO ADD:  My second attempt at a mirror glaze came out SO much better.  It helps that I was more comfortable with the many steps involved.  I made the cake and jello (still can't get it out of the mold in one piece) in the morning.  Made the chocolate mousse and glaze in the evening and I made SURE to let the mousse ON the cake set in the freezer for at least an hour, so the glaze had something cold to adhere to when being poured: There's a new hype for cake decorating going around - Mirror Glaze.  It looked really neat and I wanted to try it.  But everything about it, other than the cake, was new for me.  It ended up being a caketastrophy, a tasty caketastrophy, but a mess.  My Dad said, "It doesn't matter if it looks good, what matters is that it taste good."  I want it to be both... at least once. So, here's the thing, there are three layers to this cake.  It's a "European dessert" and people online get a little offended if it's j...

NP Shirt Cake

Image
My mom's neighbor's daughter was celebrating becoming a nurse practitioner.  The neighbor asked me to make a cake for the party.  She didn't give me specifics for design, but did mention having a stethoscope on the cake.  After doing research and knowing she only wanted buttercream, I started to work on the largest cake I've made thus far, cake pan size 12 x 16. Online cake buddies helped a bunch.  They suggested using metal flower nails (at least three) in the center in a line, then spray the pan and put parchment on the pan (measure the pan with the parchment twice - once to put in the pan and the second can be used for design creating.  It was recommend to cook 45-50 minutes at 325.  It took MUCH longer and the edgers were burned, but the inside was cooked proper.  It took three batches of cake batter (recommend to fill the cake pan mid-way). While the cake baked, I made the icing. Greg helped me to shape the cake into a shirt.  I carved off th...

Finishing Course 3 and Showcase Cake

Image
At home, I worked on the roses.  I even went so far as to try some of the other flowers for the next class.  I thought the mum and carnations were the hardest.  The carnation is really the most difficult with all those layers.  The mum was a pain, because it never "opens" as a flower and for some reason that annoyed me.  But the daisy flowers - LOVE them and so easy to make! Roses start with an upside down teardrop shape. I've later realized that there are styrofoam shapes for this.  Good to know for future reference. After cutting the shapes, you need to slice the sides a little more. Use the ball tool and thin out and ruffle the petals. The cut out shape is a person - the top being the head, two arms and two legs.  Curl the middle top petal, the head, around the teardrop.  Then an arm, then an opposite leg, then the other arm and then the last petal. Now you have a rose bud! Add another layer. To keep the layers in place, I realized that using t...