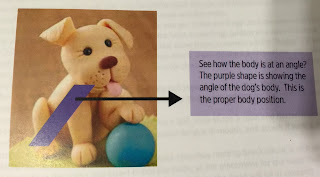
Wilton Modeling 101 - Puppy Figurine
For this class, we used the Measure N Shape sizing tray. I like this idea, because if I made this again for a dog or another animal, I can have a measure tool to get the right sizes other than looking at a You Tube video and "guestimating" how much gum paste or fondant or Shape N Amaze edible decorating dough (which is what we used in the class).
Make some gum paste glue by mixing water and shaved pieces of gum paste.
The Shape N Amaze dough is HARD. Break off small pieces and work in your hands until easy to move. Then put under saran wrap to keep it soft. Color the fondant as you need (put a small amount of dye into the center and fold over the center to keep the dye off of your hands).
Tint enough for the entire dog, about 2 1/5 inch ball of fondant. (takes a little more than half of the shape n amaze in a store bought container)
For Body of the dog:
Tint a 1 1/2 inch ball of fondant or if using the sizing tray - put the dough into #13 box, press into the box and then use your fingers to wipe off anything outside of the box. Roll the dough into a thick cone. Place the wide end of the cone on the work surface and push slightly to flatten the bottom. Push the cone slightly forward so it leans.
For Legs:
Using same tint as the body, make four legs using # 4 in sizing tray. Roll each ball into a 2 inch log, might need to be a little longer.
To shape the front of the legs - the front leg that is down, make the ankle by rolling the log about 1/4" from the end to make it a little thinner. The "ball" at the end of the log is now the paw. Bend the paw and make the toes with the knife tool. Use the ball tool to make the area on the BODY for the front leg. Use the gum paste water to attach the leg.
The front leg that is up - roll ankle thinner, bend the paw down and mark the toes as previously done. Now.... bend the leg up in half to form a knee. Use a paper towel and ball it up to support the bending dog's leg. Attach the leg after using the ball toll on the body.
Back legs - create the ankle, bend the paws and mark the toes. Bend the leg in half to form the knee, kind of like an upside down V. Slightly flatten the top of the leg/thigh area and press against the bottom back section of the body. Attach the same way.
For Tail:
Using same color, using # 1 in sizing tray - roll into a long cone. Use ball tool on body and attach the tail.
For Head:
Using same color, using # 11 in sizing tray - form a ball. Thin the middle of the ball with using a finger to form the snout. Kind of like a soft bean shape. Continue to shape the head.
Use ball tool to make place for the eyes and nose (not a large ball tool though). Use a knife tool to mark eye wrinkles, lashes, mouth and use toothpick to mark whisker holes.
Insert black sugar pearls for eyes (for mine, we didn't have black, had to use silver). Push pearls into head - no water is needed.
Attach head to the body. Take a toothpick (might need to break about 1/3 of it off so it's not longer than the body). Insert it into the body. Make sure to brush the toothpick and body with gum paste glue. Make sure there is good contact between head and body.
For the nose, tint pink and roll into a ball and attach. But I've read on other blogs, that the nose should be upside down triangle shape! Use toothpick to make the nostrils.
Use a tool to draw the mouth and then push in and down to open the mouth. For the tongue, tint 1/4 inch ball pink. Roll into a ball, then shape a cone and flatten it. Mark the center line with a toothpick. Insert tongue into mouth and attach.
For ears: create two # 1 balls. Shape them into cones and flatten. Shape ear like feather if you want. The point of the cone is where the ear will be attached to the head.
For droopy ears, leave a rounded bottom edge. For short, pointy ears, shape the bottom of the ear into more of a point.
Attach ears with glue.
Dog Toys/Accessories:
Bone: # 1 ball, roll into a 2 inch log. Roll the ends thinner, leaving about 3/4 in the center fat. Continue to roll the ends until they are long and thing enough to tie a knot.
Ball: # 8 ball and roll it smooth (marble it if desired). It should fit under the dog's paw.
Rug: Tint # 11 ball - roll out to size of rug.
Bowl: Any color # 4 ball. Roll and press a small circle into the center.
Attach dog and dog toys/accessories with gum paste glue.
Finished product!


Comments